Showing posts with label DIY Projects. Show all posts

Spring Cleaning

It's that time of year - spring cleaning. So, I thought I'd take a break from the "home tour" and post about cleaning... yay! Lol. While some people might say I'm "nesting" since I'm 38+ weeks pregnant... I beg to differ. :) It's been a year since we moved into our new home and it's spring which means this house is due for a good scrubbing.

I do a good cleaning every week, but I was inspired by this to do a more detailed cleaning of the details this spring. Also, if you're interested my cleaning routine resembles this posting from Clover Lane (I love the idea of the rotation).

Here is some additional inspiration:


I made up that pretty little sign using PicMonkey. Love it and it is so true!

Tomorrow, I'll post some of my favorite DIY cleaning tricks. I'd love to know yours!

DIY White Growth Chart

I've been eyeing up this Ruler Growth Chart from Dear Lillie for a while now and finally decided to make my own. The original costs $75 and I made mine for about $12, so I was pretty excited! I mainly used things I already had around the house - primer, white paint, brushes and polyurethane. I only really purchased the board and some black craft paint. Here's how I did it (and how you can, too)!

There are tutorials all over Pinterest, but here are a few I found helpful (I took things I liked and/or found helpful from each post below):


The quick summary of what I did:
- Purchase board at Home Depot (I made sure to buy a straight smooth board).
- Sand rough edges (this took me no more than 1 minute).
- Paint a coat of primer (let dry), then add coats of white paint until desired finish. Let dry overnight.
- Next, I had Mr. Evans install a little mounting bracket to the back and we hung it in place on the wall (so that the top of the board was as close as possible to the desired height). From here, I added 1 inch tick mark measurements (verrry lightly in pencil) so that it lined up with the height from the floor.
- Then, I gathered my sharpie, ruler, a ball point pen, craft brush and black paint. I also had printed out the numbers to trace per step #4 in the instructions here.
- I used a sharpie for the inch marks. For the numbers I transferred them on with a ball point pen and filled them in with a small craft brush (luckily I have a steady hand, but you could use sharpie as well I suppose).
- Last, I put on one coat of polyurethane to seal in the sharpie, color, etc. Hang it back up and you're all set! It's so easy! :)

Here is the finished product - I quickly snapped a few photos on my iPhone! I realize these are terrible photos, but there are so many great photos on Pinterest that you'll get the idea! Ours hangs between the two girls bedrooms (on the wall outside their bathroom), as both will be measured on this chart!


DIY Pelmet Box

I get a lot of questions about how I made these Pelmet Boxes from Nina's nursery at our old house. I posted a picture of the finished product, but never a tutorial of the steps. So...

I recently made a pelmet box for the powder room at our new house and took photos along the way. I did it all by myself in about 45 minutes. It's easy and cheap! Here's the tutorial!

Supplies needed to make 1 pelmet box:
- 1/2 inch foam core board ($5)
- box cutter
- 1/2 yard quilt or craft batting ($3)
- stapler
- staple gun
- 1/2 yard fabric (price depends on your choice!) - tip: iron it to remove wrinkles!
- hot glue or gorilla glue
- duct tape

The first step is to make your frame. Cut the foam core board to the size of your window (leaving about an inch or two on each side, so if your window was 24 inches wide make the length of the board 28 inches or so). The width and depth is to your liking! Also, make two corner pieces. Do not tape anything down yet.

Next, set the corner pieces aside. Duct tape the two edge pieces. Then, lay down your fabric and batting (as shown below). Make sure to line up your fabric so it's centered and straight. This is important so that when you staple it down, it's not all wonky!

Start by stapling down your batting. A regular stapler will do for this. I wrote "top" (as shown below) so I always knew which way I was working.

Staple the batting along the edges. Ensure that it's smooth and pulled evenly. There is no need to stretch it too tight, otherwise it will ripple.

Next start stapling down the fabric. Be sure to pull it evenly (if you have a pattern) so it doesn't have ripples. See how my pattern is even along the edges?

Then, do your corners. Keep in mind, you cannot staple through duct tape so work around it. Here you may need the staple gun.

When it  comes to corners of the corner pieces, wrap it like a present. Press your finger between the fabric and board and hold... and then...

Fold over so it's nice and clean. You may need an extra set of hands here to use the staple gun while you hold the fabric down (it depends how coordinated and strong with a staple gun you are).

You are done stapling the fabric on! Yipee! Now, for the top corner pieces that you set aside at the beginning. This is what will hold it too the wall (this is like a mounting shelf that rests on a nail). Basically, you schlep these pieces in the top corners. I used a combo of hot glue and gorilla glue and jammed it in the 90 degree angle so it was tight. I held it for a few minutes until the glue was mostly set (although if you've worked with Gorilla Glue you know that it needs to expand overnight).

You may be wondering, why not use duct tape or the stapler to secure these little triangular pieces? Well, since these two little pieces support the entire pelmet box, they need the extra help. You'll notice that the staples can come loose because they really don't grip into the foam core board that well (but it's good enough to hold the batting and fabric down). Make sense?

Almost done! The final step is to put two nails at the corners of where you're box will hang. This will take a bit of guess work. I had to move the nails below twice to ensure they rested properly on the corner triangle pieces. There is no need to use screws or drywall anchors, just regular old nails or finishing nails will do. Whatever you have laying around is fine. The finished pelmet box doesn't weigh much.

Here is mine all hung up! I apologize for the terrible photo! I blog at night once Nina is sleeping! :) Also, the wall color is not green - it's Benjamin Moore Kingsport Gray.

Any questions? What do you think?

DIY Valentine's Cards

In anticipation of Valentine's Day tomorrow, we made these fun DIY cards for Nina's grandparents. I think they turned out pretty cute!


P.S. DIY Halloween craft here
P.P.S. DIY winter/Christmas here

Leftover Christmas cards

What to do with leftover Christmas cards? It seems wasteful to trash them since so many are so chic these days!

My solution this year (with a busy, book loving toddler) was to create a very simple Christmas card book. I hesitated posting about this because seriously this isn't that ingenious of an idea. However, it's almost February and Nina looks at this thing once a day.

She loves seeing photos of friends and family (thanks to all who sent one our way). It's a great little recycled and cheap learning tool!

To see how we keep and display our family cards, click here.


DIY Snowflake Finger Painting Art

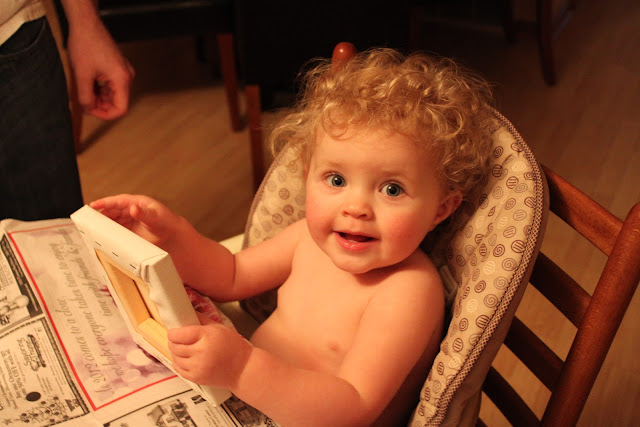
For Christmas, Nina wanted to make some DIY art for her grandparents. I decided finger painting and a snowflake theme were just the thing.

To begin, I purchased two small square canvases at Hobby Lobby. I cut strips of blue painters tape to create a snowflake pattern.

Then, we stripped Nina down to her skivvies - I knew a messy bath was in our future. Luckily, I had Mr. Evans there to help. I am so thankful I didn't try this by myself.

Nina absolutely loved the idea of an art project. She thought it was fun to be a nakey baby sitting in her high chair with newspaper all over.


Initially, she seemed to be intrigued by the paint. I had to help a bit, but she seemed to be enjoying it. Perhaps we found a baby Picasso?

Minutes later she either realized she was messy, was angry that we wouldn't let her eat this blue stuff on her hands, or was confused by what it was. And with that, we were done.

Here's the finished project - one for Grandma and Grandpa, the other for Grandbear and Meemaw. We hope you liked it. Nina sure enjoyed creating this masterpiece for you.

Nina's Pink & Yellow First Birthday Party

A few days after Ironman, we celebrated our little miss Nina's first birthday. Her birthday was September 13, but we officially celebrated on September 15 - it was a Saturday and gave us a few extra days to recoup after being away in Madison.

Nina has grown up into a spunky, smiley and busy little baby. I couldn't be more proud. We love her more than anything and look forward to watching her grow into a smart, beautiful and kind little toddler and little girl.

Since she brings such light to our day, I wanted her to have a birthday party that was bright and cheery. Also, I wanted to throw a party that was suitable for adults (we had about 25), but that felt like it was made for kids (we had about 6, but one was about 6 weeks old)! See below for details.

I purchased the party invitations off of Etsy from lafabriqueabricole. The listing included the invitation, tags, bunting, tented food cards and little triangle flags. You'll notice I used the paper goods throughout.
We brought a first birthday treat to daycare to start the celebrations. I made about 25 snack-size baggies full of Yogurt Cheerios, Animal Crackers and Goldfish. I also printed out some quick labels to match. Quick, no bake and a toddler crowd pleaser. 
I decided to use our backyard to set up the party. Luckily, the weather was sunny and 75.
I borrowed banquet tables, covered them with pink plastic tablecloths and purchased custom pink and yellow bouquets from our local farmer's market that morning. 
To give a little color to our backyard, I made streamer chandeliers using yellow crepe paper and embroidery hoops. 
I wanted Nina to have a special seat for her big day. I found this vintage high chair at a rummage sale earlier in the summer for $7.00. I bought a buttery yellow glossy spray paint at Home Depot and voila - good as new!
It was important to me that Nina's first birthday felt like a kids party, but was fun for adults too. I made this DIY Ring Toss game using a Dollar Store bin,  some strawberry Crush soda and canning lids.
I also made a DIY Bean Bag Toss. My mom sewed up some bean bags using leftover fabric and I made the targets using Terra Cotta saucers from Home Depot. I purchased the saucers in varying sizes, painted them white and added pink point values.
We also played Pin the Bow on the Baby. My mother-in-law printed and laminated a cute photo of Nina and we aimed to place the hair bow on her head. 
The younger guests received small favors. I simply taped together bubbles and sidewalk chalk. Easy but cute.
Since this was a first birthday party, I didn't want to go overboard on a bar. So, I kept things simple - bottles of water, white wine and a nice beer selection (Octoberfest varieties and Spotted Cow). In addition, I put together a Lemonade Bar to keep with the yellow theme. To accompany the lemonade, there was mixed berries and fresh mint leaves.
Bunting lined the buffet table.
I also made bunting using Nina's month-by-month photos.
A snapshot of the buffet table. I borrowed the chaffing dish and kept the rest of the decor simple.
In addition to cake, we had lemon tartlets and Limoncello for a celebratory toast. 
We're all wearing yellow! :)
I purchased Nina's first birthday cake from our local bakery - Hankerson's.
It was chocolate and white with raspberry filling and whipped frosting. Yum.
Nina also had her own decorated smash cake!
Nina's party dress was purchased from Adelaide's Boutique on Etsy. I worked with Heidi and she was so helpful in making the dress fit our party theme perfectly.


Present time!
Someone was a happy!
For the dinner menu I wanted something simple, but delicious. I opted for a Macaroni and Cheese Bar. Perfect for one-year olds, kids and adults! Toppings included chicken, bacon, an herb mix (green onions, basil and parsley), blue cheese and sauteed mushrooms.
I also made Watermelon and Pineapple Skewers (again to match the theme). Salad was made with a homemade poppy seed dressing, strawberries and pine nuts.
For the Macaroni and Cheese, I used this recipe and multiplied it by five.


She LOVED her cake!

Nina's birthday hat was purchased from Dainty Couture on Etsy. The shop is the cutest!
I think my little girl is pretty cute, too! :)
Happy Birthday Nina Lorraine.

LinkWithin

Related Posts Plugin for WordPress, Blogger...
 
Blogging tips